Are your Styrofoam or plastic Halloween tombstones falling over no matter how well you try to secure them? Does the wind keep blowing them away every year, causing you to chase after them down the street before you lose them or even worse, before they cause a car accident? If so, I know the feeling, believe me – and I can help.
The truth is that unless you live in a wind-free part of the world (I’ve yet to hear of one), the cheap plastic supports and small metal spikes included with the tombstones simply don’t work. Over the years I’ve tried numerous techniques to secure my decorative tombstones to my lawn, including adding wooden dowels along the back for support, using longer metal spikes for a deeper fit, and placing heavy bricks to the front and back for added resistance, all to no avail. The tombstones would simply tear off and fly away. At one point I became so disillusioned that I even gave up on the outdoor graveyard idea altogether.
The tombstones sat in my garage, daring me to find a way though — and because they just looked so good, I had to try again. Finally, after years of trial and error, I found success!
I’ve lived in both Southern and Northern Ontario (Canada) and have experienced heavy, unforgiving October winds every single year. I’ve found a technique that works for me, which I’ll share with you now as it should work in your area as well.
The solution I used was inspired by my father, a builder who’s spent most of his life in new home construction. He recommended I use wooden supports, so I used the technique below. It’s easier than it looks and works just as well on plastic and Styrofoam tombstones.
Be sure to read through the instructions before you start, to ensure you fully understanding the process.
What You’ll Need
- Particle board (2 pieces per tombstone)
- Gorilla glue
- Corner braces
(x2) with screws
- U nails
(x2)
- High-quality tent stakes
(x2)
- Saw (if particle board isn’t pre-cut)
- Screwdriver
- Rubber mallet
or hammer
- Grey spray paint
(optional)
What to Do
- Create a reinforced back for the tombstone by cutting some particle board to roughly the shape of the tombstone; be sure it’s flush with the bottom of the original tombstone; if you want, paint the particle board grey or black to blend better with your tombstone (let dry)
- Secure the board to the back of the tombstone with Gorilla glue; let the glue set as per its directions
- Create a wooden base for the tombstone by cutting another piece of particle board similar to a 2 x 4 or 2 x 6; ensure that it’s wider and deeper than the original base of the tombstone; if you want, paint the particle board grey or black to blend better with your tombstone (let dry)
- Lay the wooden base flat on the ground, then place the tombstone right-side-up on top of it and secured both boards together using corner braces (L-brackets) and screws
- Pound two U nails into the back of the base using a rubber mallet or a hammer; be sure to leave enough room for the tent spikes to fit
- Place your tombstone at the desired location and secure into the ground by driving a high-quality 12-inch (or longer) tent spike through each U nail. Voila!
Warning: Do NOT spray paint Styrofoam – it will melt! If you’re planning to paint the wood, be sure to do so in advance and let it dry before attaching it to the tombstone.

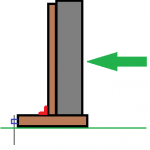
Side view. Arrow shows front of tombstone. Corner braces shown in red, U nails in blue. Not to scale.

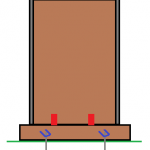
Rear view. Corner braces shown in red, U nails in blue. Not to scale.
Here are a couple of images to help you visualize the finished product. I’ve excluded the paint to emphasize the contrast between the original tombstone (grey) and the particle board (brown).
I hope this helps! If you’ve had success with any other techniques, please feel free to share by posting a comment below. You can also check out the Decor section for more on props and decorations.

We cut PVC pipe, glued to the back of the tombstone, hammered some rebar into the ground, & slid the PVC over the rebar. We haven’t lost a tombstone to wind since we started doing this 5 years ago.
That is a great solution Kat! Thank you so much for sharing! Have you had any issues with the pipe sliding up the rebar?
I’m really glad you wrote this article. This has been very confusing for me. Thank you for the help!
You’re welcome Johnny! Always happy to help. Let me know if you need help with anything else.